
BackTrack adalah distribusi Linux yang didasarkan pada Ubuntu , yang dirancang untuk hacker dan / atau profesional keamanan, dan sarat dengan Free Software terbaik dan aplikasi penetrasi pengujian Sumber Terbuka yang tersedia.
The latest edition is BackTrack 5 R2 (the “R” is for Revolution), and the most recent article about it published on this website, before the publication of this one, is Install BackTrack 5 Revolution 2 on external hard drive . Edisi terbaru adalah BackTrack 5 R2 ("R" adalah untuk Revolusi), dan artikel terbaru tentang hal itu dipublikasikan di website ini, sebelum penerbitan satu ini, adalah Install BackTrack 5 Revolution 2 pada hard drive eksternal .
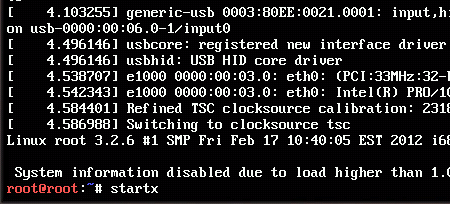 In this article, the steps required to dual-boot the KDE edition with Windows 7 (there is also a GNOME edition), are presented. Dalam artikel ini, langkah-langkah yang diperlukan untuk dual-boot edisi KDE dengan Windows 7 (ada juga edisi GNOME), disajikan. To begin, download an installation image from here . Untuk memulai, men-download gambar instalasi dari sini . Burn it to a DVD, then place the DVD in your computer's optical drive and reboot. Burn ke DVD, kemudian menempatkan DVD dalam drive optik komputer Anda dan reboot. The system will boot into a console and you will see a prompt just like the one in the image below. Sistem akan boot ke konsol dan Anda akan melihat prompt seperti yang ada di gambar di bawah ini. To boot into a Live KDE desktop, type startx and press the Enter key on your keyboard. Untuk boot ke desktop KDE Live, jenis startx dan tekan tombol Enter pada keyboard Anda.
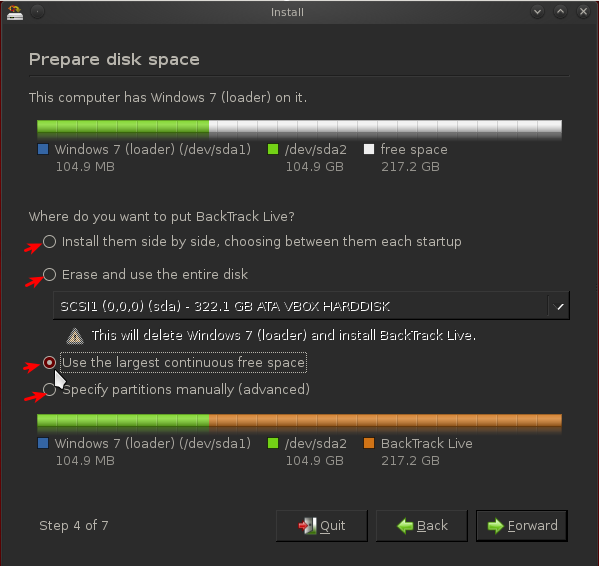
Once in the Live desktop, click on the Install BackTrack icon on the desktop. Setelah di desktop Live, klik pada ikon Install BackTrack pada desktop. And when the installer launches, click through the first few steps until you get to the one shown below, It is the fourth of eight steps of the installation process. Dan ketika installer meluncurkan, klik melalui beberapa langkah pertama sampai Anda mendapatkan yang ditunjukkan di bawah, ini adalah yang keempat dari delapan langkah dari proses instalasi. Notice that you have four disk partitioning options. Perhatikan bahwa Anda memiliki pilihan disk empat partisi. How you want to set up the dual-boot system will determine which one you select. Bagaimana Anda ingin membuat sistem dual-boot akan menentukan mana yang Anda pilih.
Since the objective is to set up a dual-boot system, you obviously do not want to choose the second option (Erase and use entire disk). Karena tujuannya adalah untuk membuat sebuah sistem dual-boot, Anda jelas tidak ingin memilih pilihan kedua (Menghapus dan menggunakan seluruh disk). Select the first option if all the space on the disk is taken up by Windows and you want the installer to shrink Windows and install BackTrack. Pilih opsi pertama jika semua ruang pada disk diambil oleh Windows dan Anda ingin installer menyusut Windows dan menginstal BackTrack. Select option 3 (Use the largest continuous free space) only if there is unpartitioned space on the target disk and you want the installer to auto-partition the space. Pilih opsi 3 (Gunakan ruang terbesar bebas terus-menerus) hanya jika ada unpartitioned ruang pada disk target dan Anda ingin installer untuk auto-partisi ruang. Use the fourth option (Specify partitions manually (advanced)) if you want to create a custom set of partitions. Gunakan opsi keempat (Tentukan partisi secara manual (lanjutan)) jika Anda ingin membuat seperangkat kebiasaan partisi. This assumes that you have some knowledge of disk partitioning in Linux. Ini mengasumsikan bahwa Anda memiliki pengetahuan tentang partisi disk di Linux. If you do not, and want to go this route, you might want to read guide to disks and disk partitions in Linux and tips for dual-booting Windows and Linux . Jika Anda tidak, dan ingin pergi rute ini, Anda mungkin ingin membaca panduan untuk disk dan partisi disk di Linux dan tips untuk dual-boot Windows dan Linux .
Just to show how this can be done manually, the last option is selected for this tutorial. Hanya untuk menunjukkan bagaimana hal ini dapat dilakukan secara manual, opsi terakhir yang dipilih untuk tutorial ini.
And it just so happens that the target disk has some unpartitioned space. Dan kebetulan bahwa target disk memiliki beberapa ruang unpartitioned. So the next step is to select it and click the Add button. Jadi langkah berikutnya adalah pilih dan klik tombol Add. By default, the BackTrack 5 installer creates just two partitions – one for the root partition, and the other for Swap. Secara default, BackTrack 5 installer menciptakan hanya dua partisi - satu untuk partisi root, dan yang lainnya untuk Swap. For a distribution of this sort, that is likely all you need, unless you want to add an NTFS partition at the end for whatever reason you can think of. Untuk distribusi semacam ini, yang mungkin semua yang Anda butuhkan, kecuali jika Anda ingin menambahkan partisi NTFS di akhir untuk alasan apa pun yang dapat Anda pikirkan. For this tutorial, just two partitions will be created. Untuk tutorial ini, hanya dua partisi akan dibuat.
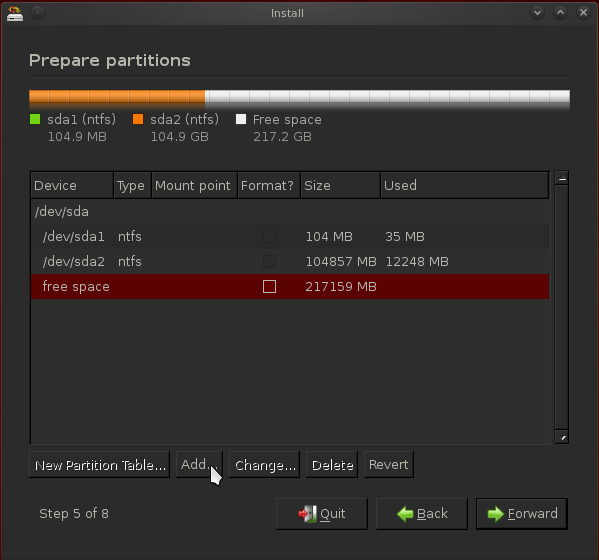
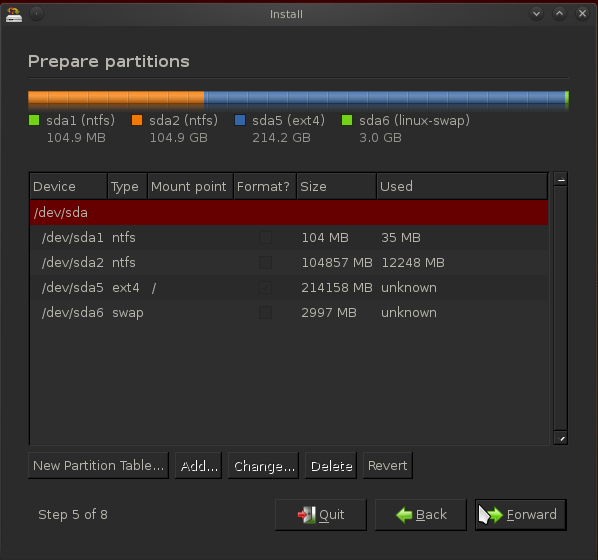
This is the partition setup window. Ini adalah jendela pengaturan partisi. Since there are two existing partitions (the Windows 7 partitions), the installer will attempt to create the BackTrack partitions as logical partitions, which is just fine. Karena ada dua partisi yang ada (Windows 7 partisi), installer akan mencoba untuk menciptakan partisi BackTrack sebagai partisi logis, yang baik-baik saja. BackTrack, like any Linux distribution, can boot from a logical or primary partition. BackTrack, seperti distribusi Linux, dapat boot dari partisi logis atau primer. If you are confused about “primary” and “logical,” take a few minutes to read guide to disks and disk partitions in Linux . Jika Anda bingung tentang "primer" dan "logika," mengambil beberapa menit untuk membaca panduan untuk disk dan partisi disk di Linux .
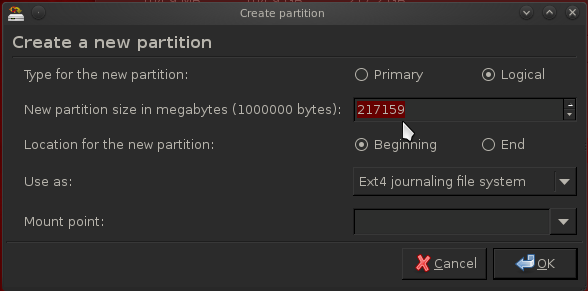
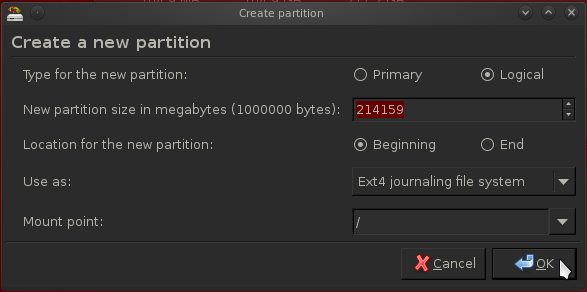
What you need to do at this step, is specify the amount of disk space you want to use for BackTrack 5, then select the file system from the “Use as” dropdown menu (the default is ext4). Apa yang perlu Anda lakukan pada langkah ini, adalah menentukan jumlah ruang disk yang ingin Anda gunakan untuk BackTrack 5, kemudian pilih sistem file dari "Gunakan sebagai" menu dropdown (default adalah ext4). Finally, select the mount point from the “Mount point” dropdown menu. Akhirnya, pilih mount point dari "titik Gunung" menu dropdown.
This is what the same step looks like after the right values have been specified. Inilah langkah yang sama seperti setelah nilai-nilai yang tepat telah ditetapkan. Click OK to return to the main window. Klik OK untuk kembali ke jendela utama.
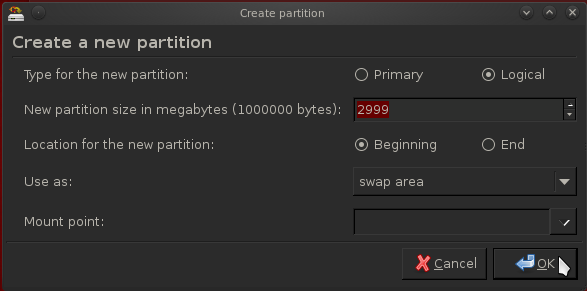
For the next partition, which should be for Swap, select “swap area” from the “Use as” menu and specify the amount of disk space you want. OK . Untuk partisi berikutnya, yang harus untuk Swap, pilih "swap area" dari "Gunakan sebagai" menu dan menentukan jumlah ruang disk yang Anda inginkan. OK.
Back to the main window, click Forward to move to the next step. Kembali ke jendela utama, klik Forward untuk pindah ke langkah berikutnya.
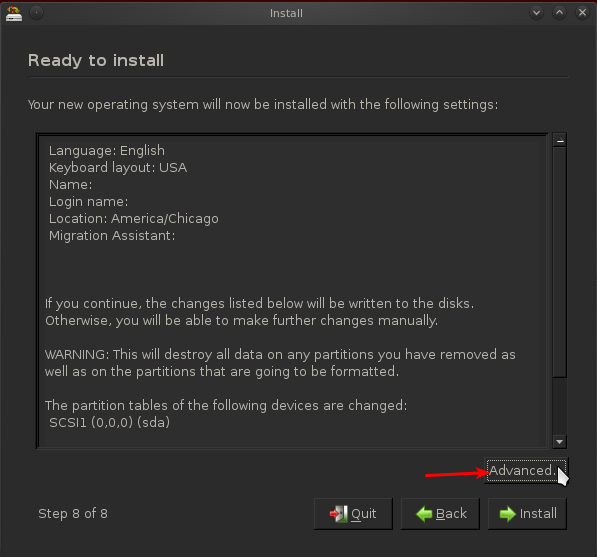
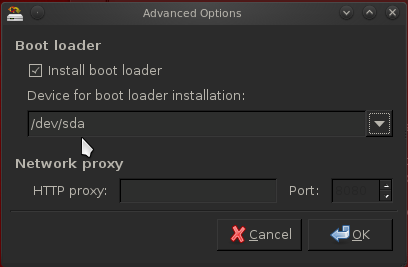
On the next step, shown here, the installer gives a summary of what it will do, based on the selections you made. Pada langkah berikutnya, ditampilkan di sini, installer memberikan ringkasan dari apa yang akan dilakukan, berdasarkan pada pilihan Anda. And this is also where you specify where you want the installer to install GRUB, the boot loader. Dan ini juga di mana Anda menentukan di mana Anda ingin installer untuk menginstal GRUB, boot loader. By default, GRUB, the GR and U nified B ootloader, is installed in the Master Boot Record (MBR). Secara default, GRUB, GR dan ootloader U B nified, dipasang di Master Boot Record (MBR). In setting up a dual-boot system with Windows, installing it there will overwrite the Windows boot loader, which could cause major headaches for you when you reinstall or upgrade Windows, or install certain anti-virus programs. Dalam menyiapkan sistem dual-boot dengan Windows, menginstal sana akan menimpa loader boot Windows, yang dapat menyebabkan sakit kepala utama bagi Anda ketika Anda menginstal ulang atau upgrade Windows, atau menginstal beberapa program anti-virus. The recommended option is to install GRUB in the root partition of BackTrack, which in this case, is /dev/sda5 . Pilihan yang disarankan adalah menginstal GRUB di partisi root BackTrack, yang dalam hal ini, adalah / dev/sda5. So, to change where GRUB should be installed, click Advanced . Jadi, untuk mengubah mana GRUB harus diinstal, klik Advanced.
That should land you here. Itu harus mendarat di sini. You can see that /dev/sda is the “Device for boot loader installation.” That is just another way of saying that GRUB will be installed in the MBR. Anda dapat melihat bahwa / dev / sda adalah Itu hanya cara lain untuk mengatakan GRUB yang akan dipasang di MBR "Perangkat untuk instalasi boot loader.".
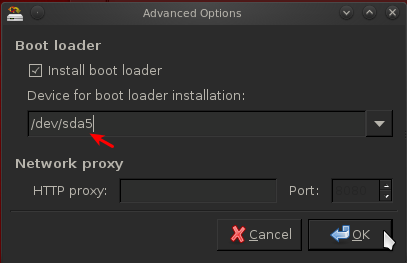
For this tutorial, you want to change it to /dev/sda5 . OK . Untuk tutorial ini, Anda ingin mengubahnya ke / dev/sda5. OK.
Back to the installer summary window, click Install to continue with the rest of the installation. Kembali ke jendela installer ringkasan, klik Install untuk melanjutkan dengan sisa instalasi.

After installation has completed successfully, reboot the computer. Setelah instalasi selesai dengan sukses, reboot komputer. It will boot into Windows, which is expected. Ini akan boot ke Windows, yang diharapkan. The next task is to add an entry for BackTrack 5 to Windows 7′s boot menu. Tugas berikutnya adalah menambahkan sebuah entri untuk BackTrack 5 sampai menu boot Windows 7. To do that, you need another application. Untuk melakukan itu, Anda perlu aplikasi lain. The easiest to use that I have found is a free-for-personal-use software from NeoSmart Technologies called EasyBCD. Yang paling mudah untuk menggunakan bahwa saya telah menemukan adalah perangkat lunak bebas-untuk-pribadi-dari penggunaan Teknologi NeoSmart disebut EasyBCD. You may download it from here . Anda dapat mendownloadnya dari sini . After download, install it in the same way that you would install any other Windows application. Setelah download, install dengan cara yang sama bahwa Anda akan menginstal aplikasi Windows lainnya.
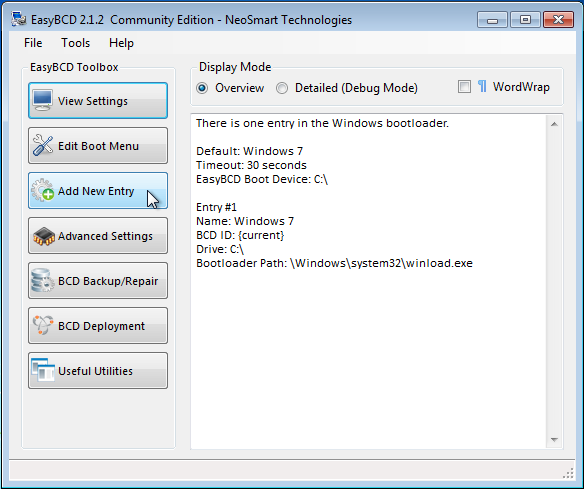
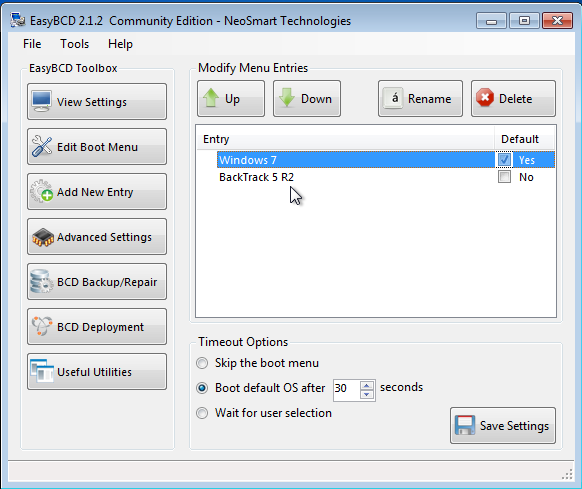
After installation, launch it. Setelah instalasi, memulai. EasyBCD's main window is shown below. Jendela utama EasyBCD ini yang ditampilkan di bawah ini. To add an entry for BackTrack 5, click Add New Entry . Untuk menambahkan entri untuk BackTrack 5, klik Add New Entry.
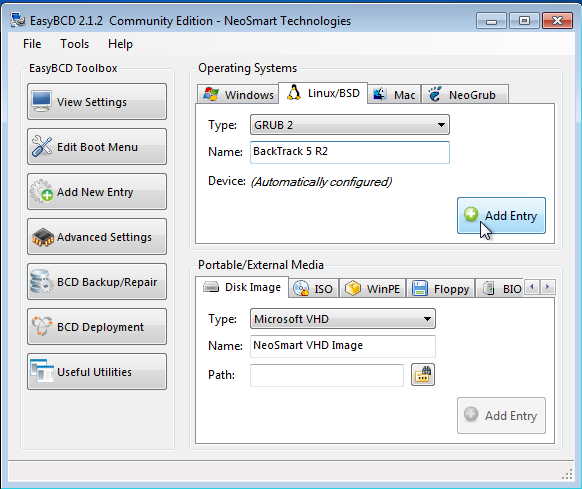
Now, you are here. Sekarang, Anda berada di sini. Click on the Linux/BSD tab. Klik pada tab Linux / BSD. Select GRUB 2 from the “Type” dropdown menu, then modify the “Name” field to reflect the name of the distribution. Pilih GRUB 2 dari menu "Type" dropdown, kemudian memodifikasi "Nama" lapangan untuk mencerminkan nama distribusi. Click on the Add Entry button, then on the Edit Boot Menu tab to see the result. Klik pada tombol Add Masuk, kemudian pada tab Boot Menu Edit untuk melihat hasilnya. GRUB 2 is the version of GRUB used by BackTrack 5. GRUB 2 adalah versi GRUB digunakan oleh BackTrack 5.
This is what the result should be. Inilah hasilnya seharusnya. Exit EasyBCD, then restart the computer. Exit EasyBCD, kemudian restart komputer.
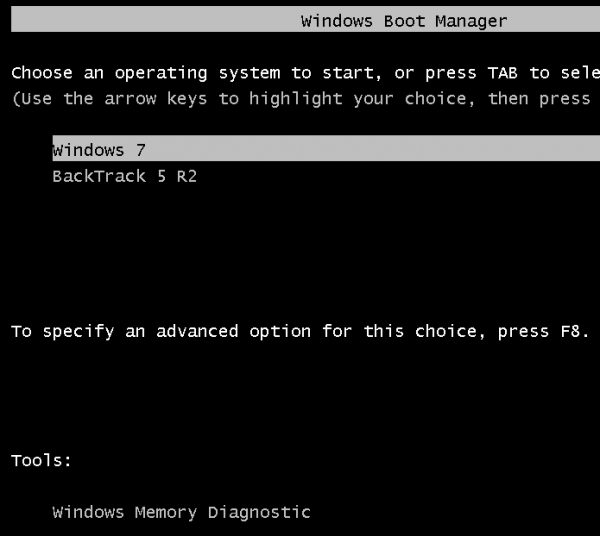
You should now see a boot menu that looks just like this one. Sekarang Anda akan melihat menu boot yang terlihat seperti satu ini. Boot into both operating systems one after the other to verify that everything is alright. Boot ke kedua sistem operasi satu demi satu untuk memverifikasi bahwa semuanya baik-baik saja. Happy hacking. Selamat hacking.
The latest edition is BackTrack 5 R2 (the “R” is for Revolution), and the most recent article about it published on this website, before the publication of this one, is Install BackTrack 5 Revolution 2 on external hard drive . Edisi terbaru adalah BackTrack 5 R2 ("R" adalah untuk Revolusi), dan artikel terbaru tentang hal itu dipublikasikan di website ini, sebelum penerbitan satu ini, adalah Install BackTrack 5 Revolution 2 pada hard drive eksternal .
Once in the Live desktop, click on the Install BackTrack icon on the desktop. Setelah di desktop Live, klik pada ikon Install BackTrack pada desktop. And when the installer launches, click through the first few steps until you get to the one shown below, It is the fourth of eight steps of the installation process. Dan ketika installer meluncurkan, klik melalui beberapa langkah pertama sampai Anda mendapatkan yang ditunjukkan di bawah, ini adalah yang keempat dari delapan langkah dari proses instalasi. Notice that you have four disk partitioning options. Perhatikan bahwa Anda memiliki pilihan disk empat partisi. How you want to set up the dual-boot system will determine which one you select. Bagaimana Anda ingin membuat sistem dual-boot akan menentukan mana yang Anda pilih.
Since the objective is to set up a dual-boot system, you obviously do not want to choose the second option (Erase and use entire disk). Karena tujuannya adalah untuk membuat sebuah sistem dual-boot, Anda jelas tidak ingin memilih pilihan kedua (Menghapus dan menggunakan seluruh disk). Select the first option if all the space on the disk is taken up by Windows and you want the installer to shrink Windows and install BackTrack. Pilih opsi pertama jika semua ruang pada disk diambil oleh Windows dan Anda ingin installer menyusut Windows dan menginstal BackTrack. Select option 3 (Use the largest continuous free space) only if there is unpartitioned space on the target disk and you want the installer to auto-partition the space. Pilih opsi 3 (Gunakan ruang terbesar bebas terus-menerus) hanya jika ada unpartitioned ruang pada disk target dan Anda ingin installer untuk auto-partisi ruang. Use the fourth option (Specify partitions manually (advanced)) if you want to create a custom set of partitions. Gunakan opsi keempat (Tentukan partisi secara manual (lanjutan)) jika Anda ingin membuat seperangkat kebiasaan partisi. This assumes that you have some knowledge of disk partitioning in Linux. Ini mengasumsikan bahwa Anda memiliki pengetahuan tentang partisi disk di Linux. If you do not, and want to go this route, you might want to read guide to disks and disk partitions in Linux and tips for dual-booting Windows and Linux . Jika Anda tidak, dan ingin pergi rute ini, Anda mungkin ingin membaca panduan untuk disk dan partisi disk di Linux dan tips untuk dual-boot Windows dan Linux .
Just to show how this can be done manually, the last option is selected for this tutorial. Hanya untuk menunjukkan bagaimana hal ini dapat dilakukan secara manual, opsi terakhir yang dipilih untuk tutorial ini.
And it just so happens that the target disk has some unpartitioned space. Dan kebetulan bahwa target disk memiliki beberapa ruang unpartitioned. So the next step is to select it and click the Add button. Jadi langkah berikutnya adalah pilih dan klik tombol Add. By default, the BackTrack 5 installer creates just two partitions – one for the root partition, and the other for Swap. Secara default, BackTrack 5 installer menciptakan hanya dua partisi - satu untuk partisi root, dan yang lainnya untuk Swap. For a distribution of this sort, that is likely all you need, unless you want to add an NTFS partition at the end for whatever reason you can think of. Untuk distribusi semacam ini, yang mungkin semua yang Anda butuhkan, kecuali jika Anda ingin menambahkan partisi NTFS di akhir untuk alasan apa pun yang dapat Anda pikirkan. For this tutorial, just two partitions will be created. Untuk tutorial ini, hanya dua partisi akan dibuat.
This is the partition setup window. Ini adalah jendela pengaturan partisi. Since there are two existing partitions (the Windows 7 partitions), the installer will attempt to create the BackTrack partitions as logical partitions, which is just fine. Karena ada dua partisi yang ada (Windows 7 partisi), installer akan mencoba untuk menciptakan partisi BackTrack sebagai partisi logis, yang baik-baik saja. BackTrack, like any Linux distribution, can boot from a logical or primary partition. BackTrack, seperti distribusi Linux, dapat boot dari partisi logis atau primer. If you are confused about “primary” and “logical,” take a few minutes to read guide to disks and disk partitions in Linux . Jika Anda bingung tentang "primer" dan "logika," mengambil beberapa menit untuk membaca panduan untuk disk dan partisi disk di Linux .
What you need to do at this step, is specify the amount of disk space you want to use for BackTrack 5, then select the file system from the “Use as” dropdown menu (the default is ext4). Apa yang perlu Anda lakukan pada langkah ini, adalah menentukan jumlah ruang disk yang ingin Anda gunakan untuk BackTrack 5, kemudian pilih sistem file dari "Gunakan sebagai" menu dropdown (default adalah ext4). Finally, select the mount point from the “Mount point” dropdown menu. Akhirnya, pilih mount point dari "titik Gunung" menu dropdown.
This is what the same step looks like after the right values have been specified. Inilah langkah yang sama seperti setelah nilai-nilai yang tepat telah ditetapkan. Click OK to return to the main window. Klik OK untuk kembali ke jendela utama.
Back to the main window, click Forward to move to the next step. Kembali ke jendela utama, klik Forward untuk pindah ke langkah berikutnya.
On the next step, shown here, the installer gives a summary of what it will do, based on the selections you made. Pada langkah berikutnya, ditampilkan di sini, installer memberikan ringkasan dari apa yang akan dilakukan, berdasarkan pada pilihan Anda. And this is also where you specify where you want the installer to install GRUB, the boot loader. Dan ini juga di mana Anda menentukan di mana Anda ingin installer untuk menginstal GRUB, boot loader. By default, GRUB, the GR and U nified B ootloader, is installed in the Master Boot Record (MBR). Secara default, GRUB, GR dan ootloader U B nified, dipasang di Master Boot Record (MBR). In setting up a dual-boot system with Windows, installing it there will overwrite the Windows boot loader, which could cause major headaches for you when you reinstall or upgrade Windows, or install certain anti-virus programs. Dalam menyiapkan sistem dual-boot dengan Windows, menginstal sana akan menimpa loader boot Windows, yang dapat menyebabkan sakit kepala utama bagi Anda ketika Anda menginstal ulang atau upgrade Windows, atau menginstal beberapa program anti-virus. The recommended option is to install GRUB in the root partition of BackTrack, which in this case, is /dev/sda5 . Pilihan yang disarankan adalah menginstal GRUB di partisi root BackTrack, yang dalam hal ini, adalah / dev/sda5. So, to change where GRUB should be installed, click Advanced . Jadi, untuk mengubah mana GRUB harus diinstal, klik Advanced.
That should land you here. Itu harus mendarat di sini. You can see that /dev/sda is the “Device for boot loader installation.” That is just another way of saying that GRUB will be installed in the MBR. Anda dapat melihat bahwa / dev / sda adalah Itu hanya cara lain untuk mengatakan GRUB yang akan dipasang di MBR "Perangkat untuk instalasi boot loader.".
For this tutorial, you want to change it to /dev/sda5 . OK . Untuk tutorial ini, Anda ingin mengubahnya ke / dev/sda5. OK.
Back to the installer summary window, click Install to continue with the rest of the installation. Kembali ke jendela installer ringkasan, klik Install untuk melanjutkan dengan sisa instalasi.
After installation has completed successfully, reboot the computer. Setelah instalasi selesai dengan sukses, reboot komputer. It will boot into Windows, which is expected. Ini akan boot ke Windows, yang diharapkan. The next task is to add an entry for BackTrack 5 to Windows 7′s boot menu. Tugas berikutnya adalah menambahkan sebuah entri untuk BackTrack 5 sampai menu boot Windows 7. To do that, you need another application. Untuk melakukan itu, Anda perlu aplikasi lain. The easiest to use that I have found is a free-for-personal-use software from NeoSmart Technologies called EasyBCD. Yang paling mudah untuk menggunakan bahwa saya telah menemukan adalah perangkat lunak bebas-untuk-pribadi-dari penggunaan Teknologi NeoSmart disebut EasyBCD. You may download it from here . Anda dapat mendownloadnya dari sini . After download, install it in the same way that you would install any other Windows application. Setelah download, install dengan cara yang sama bahwa Anda akan menginstal aplikasi Windows lainnya.
After installation, launch it. Setelah instalasi, memulai. EasyBCD's main window is shown below. Jendela utama EasyBCD ini yang ditampilkan di bawah ini. To add an entry for BackTrack 5, click Add New Entry . Untuk menambahkan entri untuk BackTrack 5, klik Add New Entry.
Now, you are here. Sekarang, Anda berada di sini. Click on the Linux/BSD tab. Klik pada tab Linux / BSD. Select GRUB 2 from the “Type” dropdown menu, then modify the “Name” field to reflect the name of the distribution. Pilih GRUB 2 dari menu "Type" dropdown, kemudian memodifikasi "Nama" lapangan untuk mencerminkan nama distribusi. Click on the Add Entry button, then on the Edit Boot Menu tab to see the result. Klik pada tombol Add Masuk, kemudian pada tab Boot Menu Edit untuk melihat hasilnya. GRUB 2 is the version of GRUB used by BackTrack 5. GRUB 2 adalah versi GRUB digunakan oleh BackTrack 5.
This is what the result should be. Inilah hasilnya seharusnya. Exit EasyBCD, then restart the computer. Exit EasyBCD, kemudian restart komputer.
You should now see a boot menu that looks just like this one. Sekarang Anda akan melihat menu boot yang terlihat seperti satu ini. Boot into both operating systems one after the other to verify that everything is alright. Boot ke kedua sistem operasi satu demi satu untuk memverifikasi bahwa semuanya baik-baik saja. Happy hacking. Selamat hacking.


wahhh.....ini yg ane cari. tpi blm berani mempraktekan. and like dh bwt ente...
BalasHapusCara Dualboot Backtrack 5 Dan Windows 7/8 ~ Black World >>>>> Download Now
Hapus>>>>> Download Full
Cara Dualboot Backtrack 5 Dan Windows 7/8 ~ Black World >>>>> Download LINK
>>>>> Download Now
Cara Dualboot Backtrack 5 Dan Windows 7/8 ~ Black World >>>>> Download Full
>>>>> Download LINK hJ
Sob ada tutornya cara instal backtrack gak kalau bisa sekaligus tutor cara hack wifi wpa/psk2 dengan backtrack 5 r2, mkasih
BalasHapusfollow blog saya sob ntar follow back, nice
www.sinaga3.blogspot.com
admin
BalasHapusklo RAM 1GB VGA 1GB
bisa ngak dual gtu
kri email ajah ke AOL
incakuiaku@aol.com
baca nya pusing gan....!!!heheheh
BalasHapusfollback
http://sdiindonesia.blogspot.com/2013/04/download-game-naruto-shippuden-battle.html
Cara Dualboot Backtrack 5 Dan Windows 7/8 ~ Black World >>>>> Download Now
BalasHapus>>>>> Download Full
Cara Dualboot Backtrack 5 Dan Windows 7/8 ~ Black World >>>>> Download LINK
>>>>> Download Now
Cara Dualboot Backtrack 5 Dan Windows 7/8 ~ Black World >>>>> Download Full
>>>>> Download LINK